Publishing Website with Quarto and Github
Why Quarto websites?
Static websites: simple, fast, free.
Quarto advantage: integrates text, code, and publishing.
GitHub Pages: free hosting for version-controlled sites.
Local Quarto Website
We will first get two types of minimal websites running locally (i.e. stored on your computer). We will use R, Quarto, Git, and Github - tools which we have mastered in last one month.
Starting Website Project
File > New Project… > New Directory > Quarto Website
Name it
mysite.Click
Create Project.
RStudio opens your new project. You should see files like:
_quarto.yml (site configuration): This is the default configuration file with the site metadata including options about looks and navigation.
index.qmd (homepage): Landing Page. Never rename this file
about.qmd (About page)
styles.css (optional, template dependent)
mysite.Rproj (the R Project file)
More detailed description of various elements is here
Basic Modifications
- In
_quarto.yaml, change the title to your name. What each section means (quick explainer)
project.type: must be website for multi-page sites.
website.title: site title in the navbar and browser tab.
website.navbar.left: list of pages shown as left-side nav links.
(Use either href: about.qmd or { text: “About”, href: about.qmd }.)
format.html: page rendering options (theme, TOC, numbering, etc.)
- In
_quarto.yaml, addoutput-dir: docsundertype: website. This is needed for hosting on Github which we will do in later steps.
project:
  type: website
  output-dir: docs
Create a file named .nojekyll in your repository’s root directory (i,e mysite/), which is required to disable some processing of HTML files that GitHub does by default. From RStudio’s Files pane, click New Blank File > Text File, then type .nojekyll > click OK (you can use the Text File option to create any file type)
Open
index.qmd. Delete the existing content. Paste the following code and make suitable modifications. Then save.
---
title: "<Your Name>"
---

I am a Ph.D. student in Government at [Georgetown University](https://government.georgetown.edu/), specializing in Comparative Politics and Political Methodology. My dissertation examines how property rights—conceptualized as symbolic, consumptive, and productive rights—shape individuals’ political strategies and political behavior, with a regional focus on India. Methodologically, I combine formal theory, fieldwork, and advanced quantitative approaches, including causal inference, spatial analysis, and Bayesian hierarchical modeling.

In addition to my research, I am deeply committed to teaching and mentoring. I have extensive experience as a teaching assistant for graduate-level courses in quantitative methods and co-lead initiatives such as Math Camp and the Methods Brown Bag series, which broaden methodological training in the department. I also design reproducible, digital-first research and teaching materials using Quarto, GitHub, and open-source workflows, reflecting my commitment to accessible, transparent scholarship.

Outside of academia, I enjoy exploring cooking science and photography. - Click
Renderon top. You should be able to see minimal functional version of your first website.
Now you have a basic version of your website. Let’s start building more.
Replace the YAML in index.qmd with the following:
Make modifications. Various paramters are explained below:
template: choose from Quarto’s built-in template options. See a full list here
image: supply it the file path to your photo with the correct file extension (png/jpeg/webp)
image-width & image-shape: adjust your image’s size and shape (round, rounded, rectangle)
links: add buttons with links to your social media pages
Press Render
Modifying/Adding Pages
As a default, Quarto website project, creates two html pages corresponding to index.qmd and about.qmd. You can modify the existing pages by changing the content/code in them, as explained above. You can change the name of the page as it appears in the top title bar by changing the following in the _quarto.yaml. Or create a new page (for eg, research.qmd, and save it in root folder), and add it as shown below.
Always, run quarto render in terminal, to build the complete website, after each step
Hosting on Github
We already know how to use Github. The website we created can be easily hosted using same steps with some additions.
Make a new repository on Github.com after logging in. Name it
mysite(same as your local project).Copy the code under …or create a new repository on the command line. Paste it in terminal at the bottom of Rstudio, and run. This should intialize your local git repo and link it to newly created online repo.
Use
git add docs,git commit -m "First website", andgit pushsequentially to put the renderedhtmlfiles indocsfolder to the online repo.On Github.com, refresh the
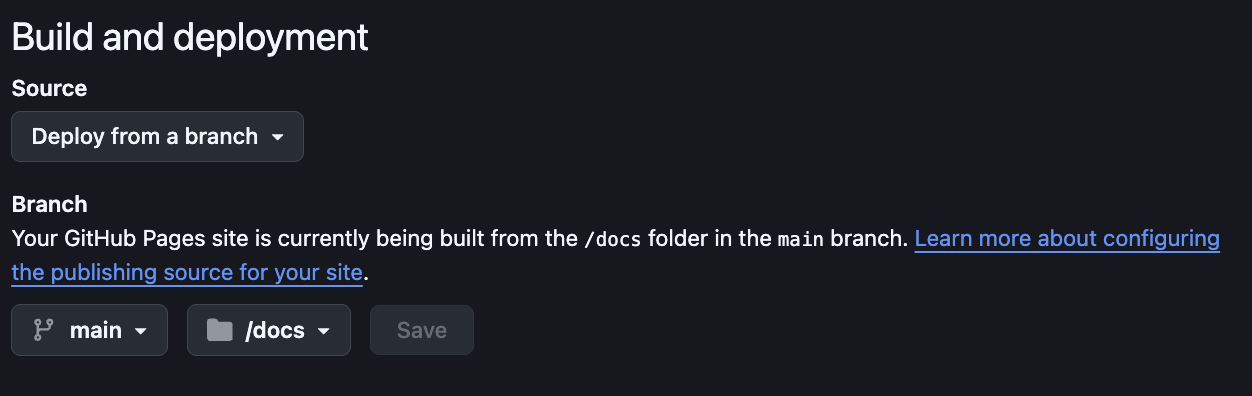
mysiterepository page. You should be able to seedocsfolder and areadmefile uploaded.Go to Settings > Pages.
Under Build and Deployment set branch to
mainand folder todocs. Save. Wait a couple of minutes.
- You website should be available publicly. Its url would be
<your-github-username>.github.io/mysite.
Review of Workflow
Start quarto website R Project
Change
output-dirto docs in_quarto.yaml.Make modifications to individual qmd files, and then in yaml. Do not forget to render by using
quarto renderin terminalMake online repo with same project name. Sync by pasting code from instructions on the online repo page into the terminal.
Use git
add,commit -m, andpushcommands to push docs folder to online Github repo.Go to Settings>Pages, and change deployment folder to
docs. Hit Save.Website is ready in a couple of minutes.
Additional Resource
Quarto Official Documentation for websites.
Quarto Documentation for Books (in html, pdf, and word format). This website is built using the book functionality. It would be particularly useful when it comes to teaching or writing a dissertation manuscript.
Sam Shanny-Csik’s tutorial on creating and modifying quarto websites.
Gallery of websites, prsentations, books, dashboards and interactive docs built with quarto. Use this for inspiration.